Build a Live Dashboard of Your GitHub Repo's Issues in 30 Minutes

When managing a GitHub repository using issues and pull requests (PRs), it can be hard to keep track of the increasing number of issues, completed tasks, outstanding PRs, and their authors. Analyzing historical data, like identifying trends over a year, adds another layer of complexity. One efficient solution is to integrate your GitHub issues data into a business intelligence tool.
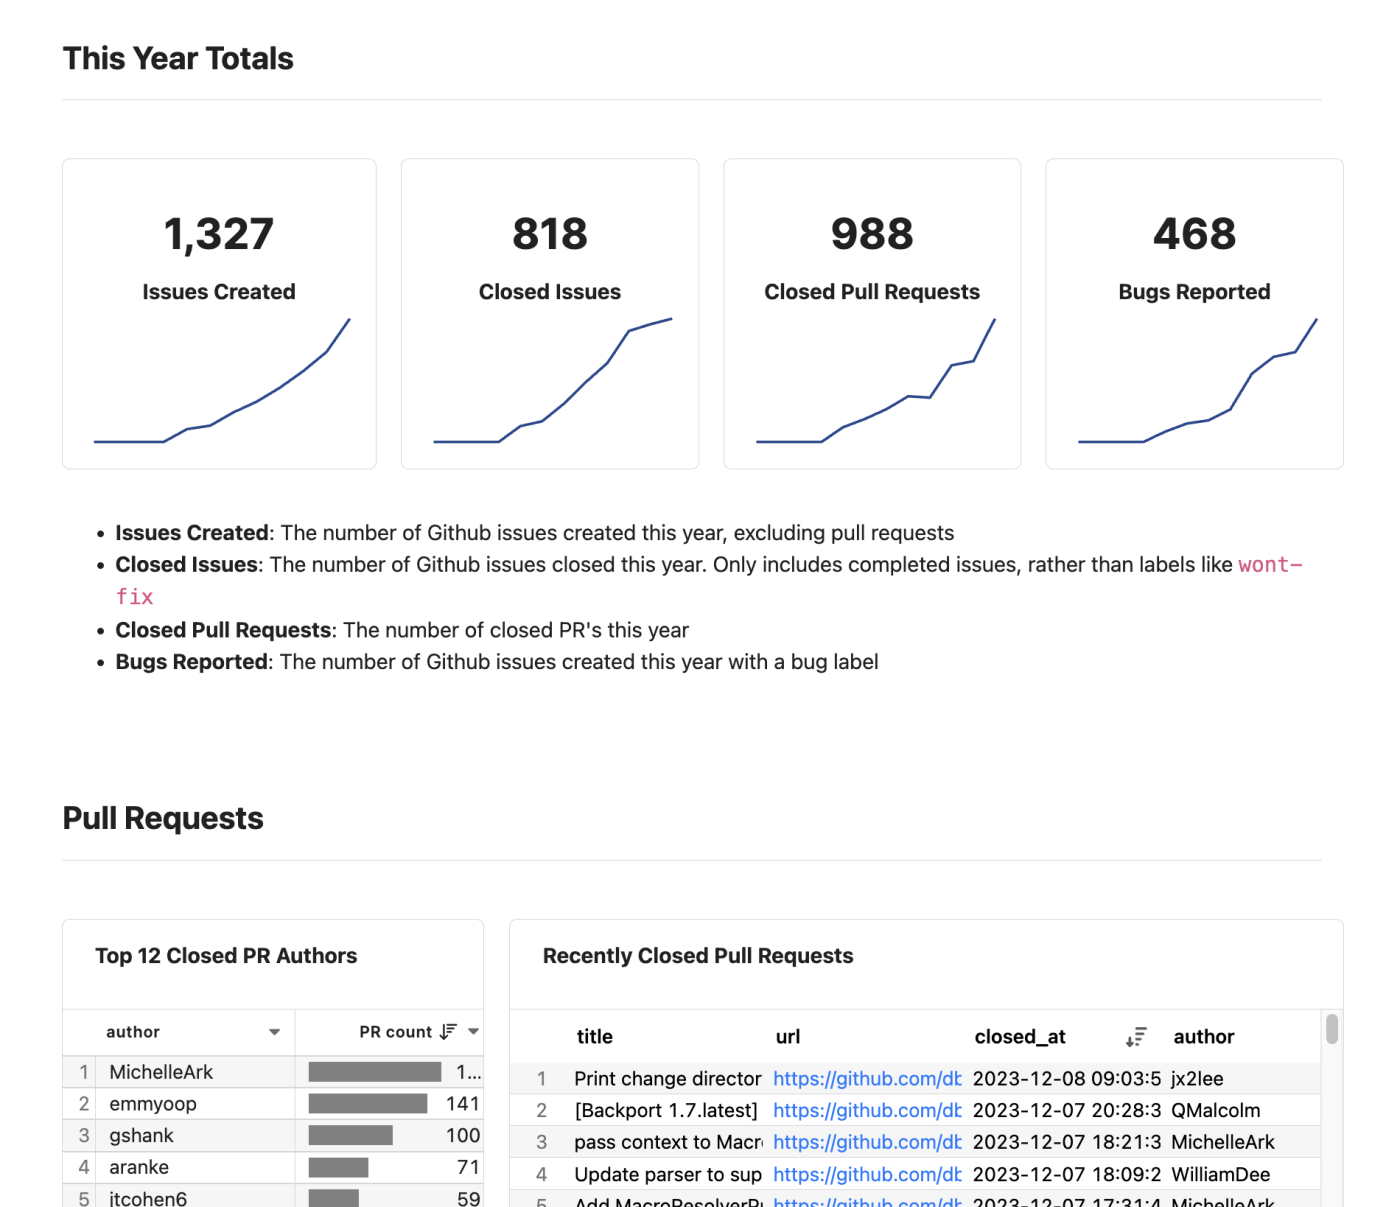
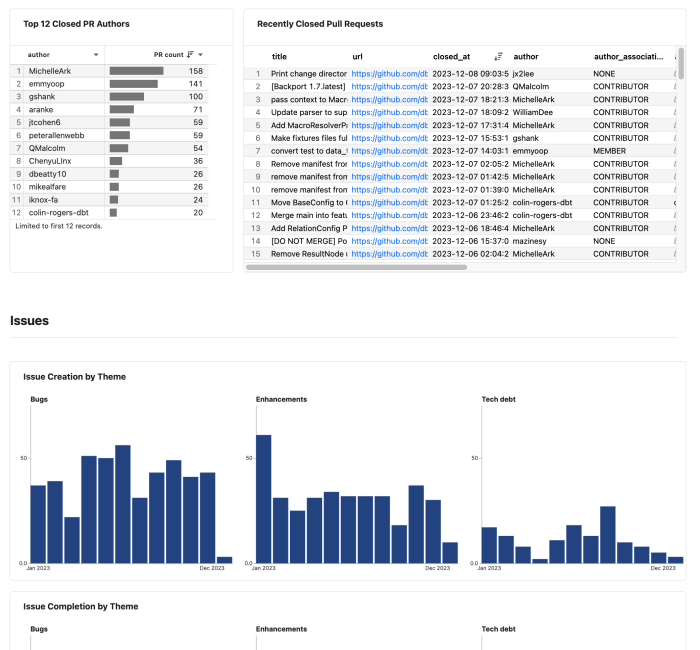
A custom dashboard in Hashboard enables you to monitor key metrics of your repository at a glance. With this dashboard, you gain a holistic view of your repository, where you can drill down, group, and filter data on the fly, even accessing the underlying data for any point in a chart or table.
In this guide, we'll set up a live dashboard using Hashboard, leveraging GitHub's REST API, GitHub Actions, and Hashboard itself. We’re going to assume this is relatively small project with thousands or tens of thousands of issues and so we can simply store the data in Hashboard itself. By the end, you'll have a comprehensive view of your repository's activity, with tools for detailed analysis and hourly refreshed data.
Setup in 30 Minutes
This guide utilizes template files for quick setup, providing ready-to-use charts, dashboards, metrics, and a data model. All you'll have to do is fork our repo and supply credentials.
Sign Up for Hashboard: Register at hashboard.com/getAccess.
Generate Access Key: After logging in to Hashboard for the first time, your project will initially be empty, which is ideal for our setup. Navigate to hashboard.com/app/p/settings#access_keys and create an access key. Detailed documentation is available at docs.hashboard.com/docs/data-ops/cli/credentials.
Create a GitHub Account: If you don't have one, sign up at github.com.
Generate GitHub Personal Access Token: Create a token in your developer settings at github.com/settings/apps. Choose a classic, general token and note it down. More details at GitHub's documentation.
Fork Hashboard Examples Repo: Visit github.com/hashboard-hq/examples and fork the repository.
Configure Repository Secrets: In your forked repo settings at
github.com/<YOUR USERNAME>/examples/settings/secrets/actionsadd the following secrets:GH_HASHBOARD_ACCESS_KEY_ID,GH_HASHBOARD_PROJECT_ID,GH_HASHBOARD_SECRET_ACCESS_KEY_TOKENfrom your Hashboard JSON access key.GH_API_TOKENfor GitHub API authentication. More details at GitHub's documentation.GH_REPO_NAMEandGH_REPO_OWNERfor specifying the repository. Enter the respective values for the Github repo you want to track.You can also use
dbt-coreanddbt-labsrespectively to replicate our demo.
HASHBOARD_CLI_BASE_URIset tohttps://hashboard.com.
Trigger GitHub Actions: Go to the GitHub Actions page, enable actions, and manually start the
Update Github Issuesworkflow. If there are errors, double check your secrets.
After these steps, return to your Hashboard project to see the results. The data will refresh every hour.
How It All Works
The process starts with an empty project and ends with a dashboard filled with fresh data and visuals. The key component here is Hashboard's CLI tool, which facilitates the automatic upload of datasets in formats like Parquet or CSV and builds all resources in a BI project using YAML config files. This allows for the creation and updating of both data and project resources in a single pipeline.
A Python script pulls issues from the GitHub API, processes the data, and outputs a Parquet file. This script is tailored to work with the labels from the dbt-labs/dbt-core repository, but you can modify it to suit your repository's labels. The script runs on a cron schedule every hour.
# examples/.github/workflows/github_issues_etl.yml
- name: Extract issues
  run: poetry run --directory github_issues python ./github_issues/extract.py
  env:
    GITHUB_API_TOKEN: ${{ secrets.GH_API_TOKEN }}
    GITHUB_REPO_NAME: ${{ secrets.GH_REPO_NAME }}
    GITHUB_REPO_OWNER: ${{ secrets.GH_REPO_OWNER }}
To update the label parsing to match the labels in your project, update examples/github_issues/extract.py . There are several lines of Pandas code parsing the results. For example, you can update the label matching for some of the filters here:
# examples/github_issues/extract.py
df["is_bug"] = df.labels.apply(lambda labels: "bug" in labels)
df["is_enhancement"] = df.labels.apply(lambda labels: "enhancement" in labels)
df["is_tech_debt"] = df.labels.apply(lambda labels: "tech_debt" in labels)
Once the Parquet file is ready, hb upload uploads it to a managed DuckDB instance within Hashboard. The hb deploy command then populates the empty project with data models, metrics, charts, and a dashboard based on the YAML files. Each YAML file describes one resource, like a chart or dashboard, and these files interlink to form a cohesive BI project. The hb build command synthesizes these files, creating a comprehensive set of resources in your project.
# examples/.github/workflows/github_issues_etl.yml
- name: Upload issues
  run: poetry run --directory github_issues hb upload github_issues.parquet
  env:
    HASHBOARD_PROJECT_ID: ${{ secrets.GH_HASHBOARD_PROJECT_ID }}
    HASHBOARD_ACCESS_KEY_ID: ${{ secrets.GH_HASHBOARD_ACCESS_KEY_ID }}
    HASHBOARD_SECRET_ACCESS_KEY_TOKEN: ${{ secrets.GH_HASHBOARD_SECRET_ACCESS_KEY_TOKEN }}
    HASHBOARD_CLI_BASE_URI: ${{ secrets.HASHBOARD_CLI_BASE_URI }}
- name: Rebuild project
  run: poetry run --directory github_issues hb deploy ./github_issues --no-preview
  env:
    HASHBOARD_PROJECT_ID: ${{ secrets.GH_HASHBOARD_PROJECT_ID }}
    HASHBOARD_ACCESS_KEY_ID: ${{ secrets.GH_HASHBOARD_ACCESS_KEY_ID }}
    HASHBOARD_SECRET_ACCESS_KEY_TOKEN: ${{ secrets.GH_HASHBOARD_SECRET_ACCESS_KEY_TOKEN }}
    HASHBOARD_CLI_BASE_URI: ${{ secrets.HASHBOARD_CLI_BASE_URI }}
Conclusion
By following these steps, you can set up a live, dynamic dashboard for your GitHub repository in less than thirty minutes. This dashboard not only presents a clear overview of your repository's activity but also offers tools for detailed analysis and decision-making, enhancing your project management capabilities.